2022. 2. 17. 13:18ㆍDB
** 참고 :
https://www.inflearn.com/course/elk-스택-데이터-분석#curriculum

ElasticSearch 설치하기
맥OS에 바로 설치할 수 없어서, Docker로 환경을 구성한다.
ubuntu 16.04 컨테이너 위에, 다음을 설치하여 이미지를 생성한다.
- JDK
- ElasticSearch
Ubuntu 16.04 에서의 시도
Step 1. JDK 설치
https://www.linode.com/docs/guides/install-java-on-ubuntu-16-04/
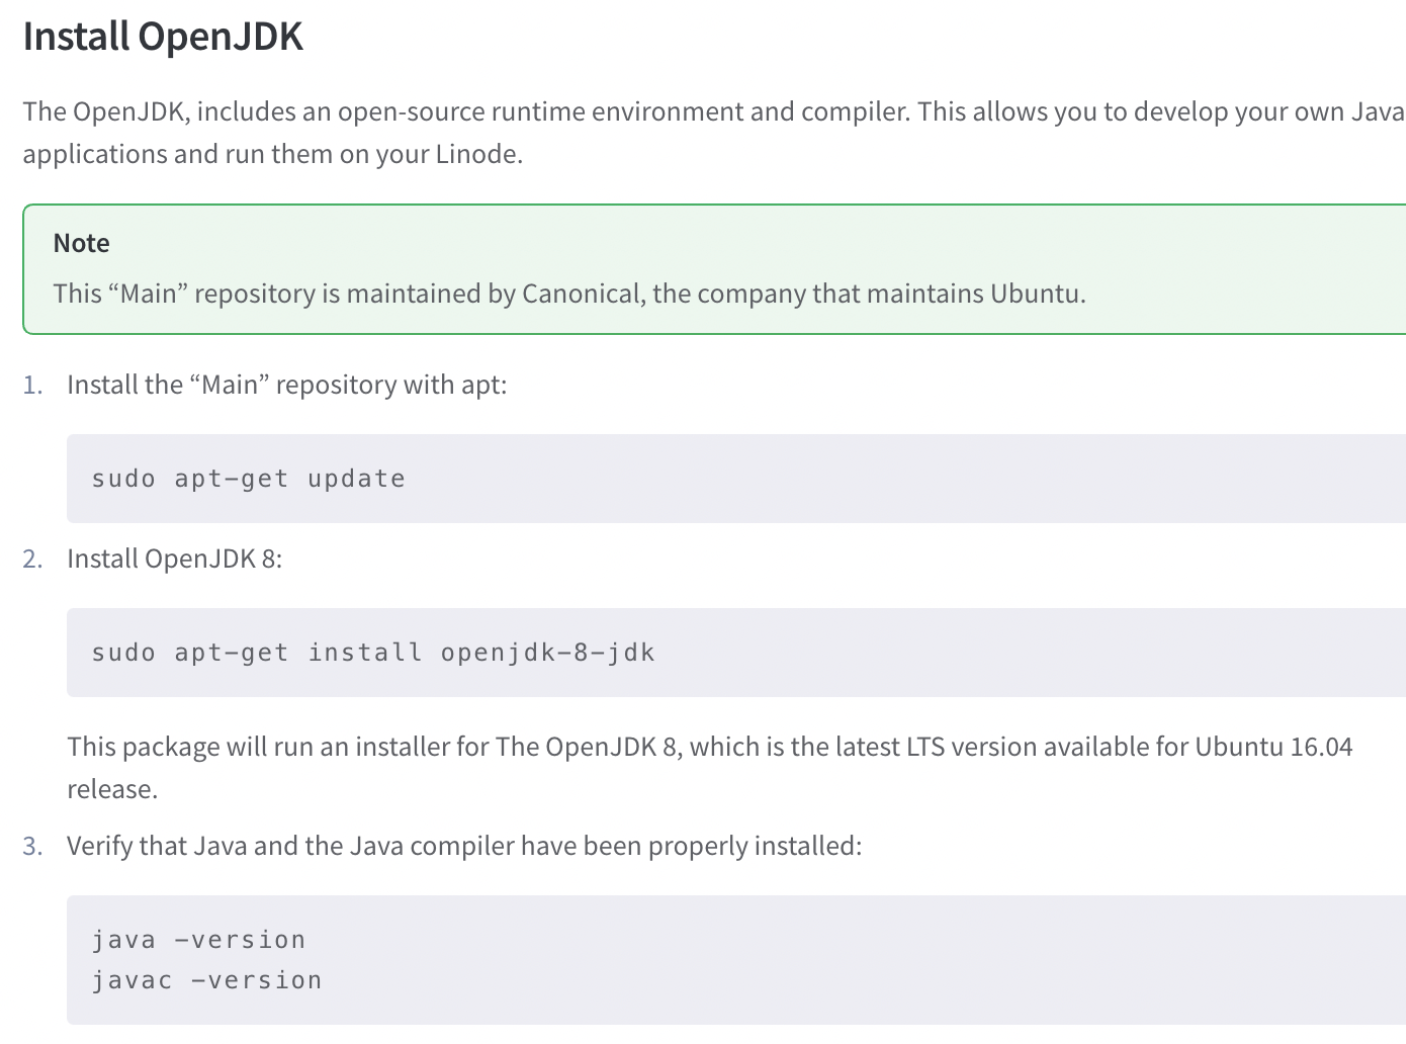
apt-get update
apt-get install -y openjdk-8-jdk

java -version
javac -version # 1.8.0 버전
Step 2. ElasticSearch 설치
https://www.elastic.co/guide/en/elasticsearch/reference/current/deb.html#deb-repo
https://www.elastic.co/kr/downloads/past-releases/elasticsearch-5-1-1

# 방법 1.
# 필요 명령어 다운로드
which wget # wget 명령어가 있는지 확인
apt-get install wget
apt-get install gnupg

# GPG 키 추가 (인증키 서명되어 있어서)
wget -qO - https://artifacts.elastic.co/GPG-KEY-elasticsearch | apt-key add -
apt-get install -y apt-transport-https
echo "deb https://artifacts.elastic.co/packages/7.x/apt stable main" | tee /etc/apt/sources.list.d/elastic-7.x.list

apt-get update # 설치된 프로그램 업데이트
apt-get install elasticsearch # 설치
apt-get install kibana

# (옵션) 서비스 등록 해두기
apt install -y systemctl
systemctl enable elasticsearch.service
# 방법 2.
# elastic_search 5.1.1 버전 설치
wget https://artifacts.elastic.co/downloads/elasticsearch/elasticsearch-5.1.1.deb
wget https://artifacts.elastic.co/downloads/elasticsearch/elasticsearch-5.1.1.deb.sha1
apt-get install -y libdigest-sha-perl
shasum -a 511 -c elasticsearch-5.1.1.deb.sha1 # 5.1.1 버전이므로 511
dpkg -i elasticsearch-5.1.1.deb # ERROR : 커널 사용불가해서
# 참고: https://forum.proxmox.com/threads/couldnt-write-4-4-1-7-to-kernel-printk.50872/
# 안됬다고 한다^^
Step 3. 설치 확인 및 실행

설치가 모두 끝났으면, ElasticSearch를 시작하고 & 끄고 & 활성화되었는지 확인할 수 있다.
단, 시작 명령을 주고, 로딩시간으로 인해 몇 분 뒤에 확인할 수 있다.
service elasticsearch start # 엘라스틱 서치 시작

apt-get install -y curl
curl -XGET 'localhost:9200' # 활성화 확인

service elasticsearch stop # 엘라스틱 서치 종료
Ubuntu 20.04 에서의 시도
https://velog.io/@qnfmtm666/elasticsearch-Elasticsearch-설치하기-Ubuntu-20.04
https://esbook.kimjmin.net
https://www.docker.elastic.co/r/elasticsearch?limit=50&offset=100&show_snapshots=false
ElasticSearch
실습 GitHub : minsuk-heo/BigData/tree/master/

왼쪽과 같은 정보를 저장할 때, ElasticSearch는 오른쪽과 같이 데이터를 저장한다.
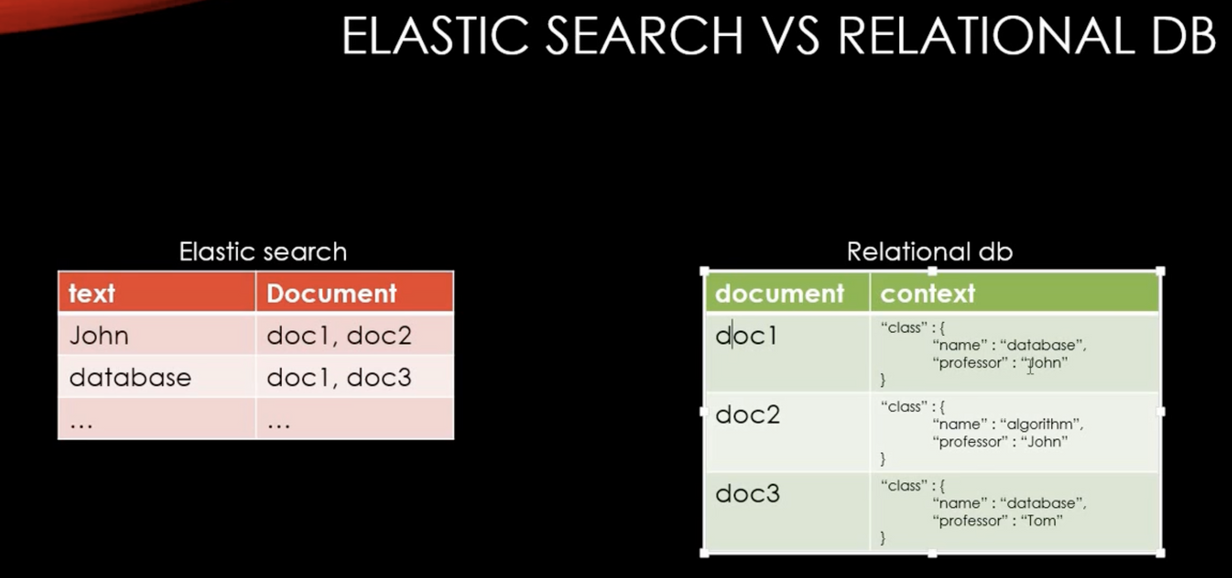
RDB와 비교해보면,
- ElasticSearch는 어떤 키워드가 어느 문서에 있는지를 저장하고,
- RDB는 문서에 어떤 정보가 있는지 저장.
따라서 검색 기능을 수행하기 위해서는 ElasticSearch가 더 낫고, 빠르다.
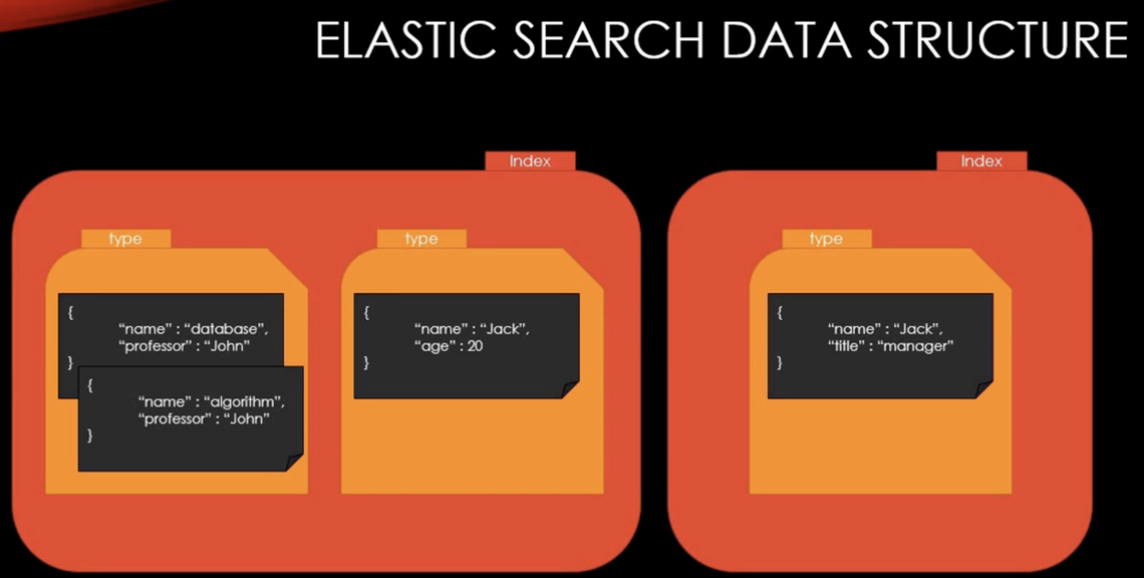
ElasticSearch의 자료구조를 보면,
- Index를 가지고 있고,
- Index 내에는 type을 가지고 있고, type 내에는 문서를 가지고 있음.
- 문서는 각각 같은 속성들을 가짐.

RDB와의 차이는 다음과 같고,
위와 같은 명령어들로 RestAPI를 전송할 수 있음.
ElasticSearch에 데이터 삽입, 삭제, 조회
ElasticSearch는 RestAPI 사용
# Index CRUD
service elasticsearch start # 엘라스틱서치 시작

# [Verify Index]
# classes라는 Index가 존재하는지 확인
curl -XGET http://localhost:9200/classes # ElasticSearch/Index_name
curl -XGET http://localhost:9200/classes?pretty # json포맷으로 출력 확인

# [Create Index]
# classes라는 Index 생성
curl -XPUT http://localhost:9200/classes

# [Delete Index]
curl -XDELETE http://localhost:9200/classes- curl : 우분투에서 데이터 전송 (?)
- -X : curl 명령어로 RestAPI를 전송하기 위한 prefix
- GET : 데이터 읽기
# Document CRUD
# [Create Document]
# 방법 1.
# ElasticSearch/Index명/type명/ID
# -d Json포맷의_문서내용
curl -XPOST http://localhost:9200/classes/class/1/ -H 'Content-Type: application/json' -d '{"title" : "Algorithm", "professor" : "John"}'

# 방법 2.
# File을 사용하여 문서 생성
# -d @파일이름
curl -XPOST http://localhost:9200/classes/class/1/ \
	-d @oneclass.json
# [Update Document]
# 1. doc속성 추가하기
curl -XPOST http://localhost:9200/classes/class/1/_update -H 'Content-Type: application/json' -d '{"doc" : {"unit" : 1}}'
curl -XPOST http://localhost:9200/classes/class/1/_update?pretty -d '
{"doc" : {"unit" : 1}}'
# 2. unit(학점)이 1이 아니라, 2임
# 방법 1.
curl -XPOST http://localhost:9200/classes/class/1/_update -H 'Content-Type: application/json' -d '{"doc" : {"unit" : 2}}'
# 방법 2. Script로 업데이트
curl -XPOST http://localhost:9200/classes/class/1/_update \
-d '{"script" : "ctx._source.unit += 1"}'# [Bulk 옵션: 여러개 문서를 ElasticSearch에 한번에 삽입]
# classes.json : Bulk(meta정보+)로 문서가 들어있음
curl -XPOST http://localhost:9200/_bulk?pretty \
--data-binary @classes.json
Q. 어떻게 매핑없이 ElasticSearch에 데이터를 삽입했나?
여태까지 그렇게 했지만, 사실 굉장히 위험한 일. 예를 들어, 숫자 데이터를 ElasticSearch가 문자로 인식하고 문자로서 삽입했을 수도 있음. 이처럼 잘못 지정된 타입의 경우, Kibana와 같은 도구로 시각화할 때 문제가 발생.
따라서 앞으로는 꼭 매핑을 하렴.
# [Mapping 추가] ==  RDB의 스키마
curl -XPUT http://localhost:9200/classes/class/_mapping \
	-d @classesRating_mapping.json

# [Mapping 확인]
curl -XGET http://localhost:9200/classes?pretty

# TEST
curl -XPOST http://localhost:9200/_bulk?pretty \
	--data-binary @classes.json # Bulk삽입
curl -XGET http://localhost:9200/classes/class/1/?pretty # 확인
# 검색하기 (Search)
https://www.elastic.co/guide/en/elasticsearch/reference/current/search-request-body.html
# 데이터 삽입
curl -XPOST 'localhost:9200/_bulk' \
	--data-binary @simple_basketball.json

# 검색 (모든 문서 출력)
curl -XGET localhost:9200/basketball/record/_search?pretty

# 방법 1. search옵션 중 URI 이용
# points 속성이 30인 것만 출력
curl -XGET localhost:9200/basketball/record/_search?q=points:30&pretty

# 방법 2. search옵션 중 Request body 이용
# -d : direct하게
curl -XGET localhost:9200/basketball/record/_search -d '
	{
		"query": {
			"term": {"points" : 30}
		}
	}'
# Aggregation
ElasticSearch 내의 문서 간의 조합을 통해 어떠한 값을 도출해내기 위해 사용.
Metric aggregation
산술할 때 사용 (ex. 평균, 최대값, 최소값)
# 데이터 삽입
# --data-binary : 파일에서 데이터를 뽑아낸다
curl -XPOST 'localhost:9200/_bulk' \
	--data-binary @simple_basketball.json

# Aggregation 파일내용 확인
nano avg_points_aggs.json

# Aggregation 수행
curl -XGET localhost:9200/_search?pretty \
	--data-binary @avg_points_aggs.json
curl -XGET localhost:9200/_search?pretty \
	--data-binary @max_points_aggs.json
curl -XGET localhost:9200/_search?pretty \
	--data-binary @min_points_aggs.json
curl -XGET localhost:9200/_search?pretty \
	--data-binary @sum_points_aggs.json
curl -XGET localhost:9200/_search?pretty \
	--data-binary @stats_points_aggs.json # 평균,최대 등 한번에
Aggregation 파일내용의 의미
- "size":0 은 보고싶은 값만 확인하고 싶어서 설정
- "aggs"는 "aggregations"라고 해도 무방
- “terms”는 팀별로 묶기 (groupBy)
- "avg_score"= aggregation 이름
- "avg"= 평균값을 구하겠다
- “max”= 최대값을 구하겠다
- "field":"points"= 필드값중에서 포인트를 사용해라
- "avg_score"= aggregation 이름
Bucket Aggregation
SQL의 group_by와 같음. 팀별로 그룹지어주는 것.
# Index 생성
curl -XPUT localhost:9200/basketball

# Mapping 추가
nano basketball_mapping.json # 매핑파일 확인
curl -XPUT 'localhost:9200/basketball/record/_mapping' \
	-d @basketball_mapping.json

# 문서 삽입
nano twoteam_basketball.json # 문서내용 확인
curl -XPOST 'localhost:9200/_bulk' \
	--data-binary @twoteam_basketball.json

# term aggs (group by team)
nano terms_aggs.json
curl -XGET localhost:9200/_search?pretty \
	--data-binary @terms_aggs.json
Kibana
# Index 생성
curl -XPUT localhost:9200/basketball

# Mapping 추가
nano basketball_mapping.json # 매핑파일 확인
curl -XPUT 'localhost:9200/basketball/record/_mapping' \
	-d @basketball_mapping.json

# 문서 삽입
nano twoteam_basketball.json # 문서내용 확인
curl -XPOST 'localhost:9200/_bulk' \
	--data-binary @twoteam_basketball.json

# term aggs (group by team)
nano terms_aggs.json
curl -XGET localhost:9200/_search?pretty \
	--data-binary @terms_aggs.json
Logstash

- ELK 스택에서 input을 담당.
- 많은 종류의 data type을 흡수하여 원하는 형태로 변환 가능. 이를 ElasticSearch에 입력.
# 다운로드 > dpkg
'DB' 카테고리의 다른 글
| 관계형 DB (RDB) 란? (0) | 2021.10.30 |
|---|---|
| 개체 Entity 란? (0) | 2021.10.30 |
| DB 설계 프로세스 (0) | 2021.10.30 |